
Forum
»
 Follow my model siege tower build (lockdown edition)
Follow my model siege tower build (lockdown edition)
 08-18-2021, 09:31 PM
-
#1

Follow my model siege tower build (lockdown edition)
I scoured the internet for plans and couldn't find any. The best I got was pictures/drawings so I'm going to wing it.
TLDR:
Spoiler!
Approximate dimentions are 120mm x 120mm x 400 high, but I always make atleast one mistake in my drawings so it may get bigger/ smaller.
It will have 4 internal levels with an open platform on the top. The bottom level will have a battering ram and the 3/4th level will have a draw bridge to get over castle walls
I will update the thread as the build progresses. I know atleast some of you de-gens like this kind of stuff so I hope you enjoy it
Getting started - I will be using recycled rimu (red pine) for the majority of the build. These boards used to be a kitchen cabinet.

Drilling the holes for the axles and shaping the wheels


Wheels looking rough and ready. 6mm steel rod for the axles

Time to size the boards for the main structure, these are about 10x10

Glueing the main uprights to the bottom floor, the tower will have a slight taper.

I will add cross pieces to make it look more authenic (and help keep it together)

I cut these little mitres by hand on the framing saw

It's starting to look like something

More updates soon, and as usual AMA
TLDR:
Spoiler!
Approximate dimentions are 120mm x 120mm x 400 high, but I always make atleast one mistake in my drawings so it may get bigger/ smaller.
It will have 4 internal levels with an open platform on the top. The bottom level will have a battering ram and the 3/4th level will have a draw bridge to get over castle walls
I will update the thread as the build progresses. I know atleast some of you de-gens like this kind of stuff so I hope you enjoy it

Getting started - I will be using recycled rimu (red pine) for the majority of the build. These boards used to be a kitchen cabinet.
Drilling the holes for the axles and shaping the wheels
Wheels looking rough and ready. 6mm steel rod for the axles
Time to size the boards for the main structure, these are about 10x10
Glueing the main uprights to the bottom floor, the tower will have a slight taper.
I will add cross pieces to make it look more authenic (and help keep it together)
I cut these little mitres by hand on the framing saw
It's starting to look like something
More updates soon, and as usual AMA
Damn
08-18-2021, 09:33 PM
-
#2
- Thunderpants
- Registered User
-

- Thunderpants
- Registered User
- Join Date: Sep 2010
- Posts: 6,542
- Rep Power: 172917
-
-

I mean I’m going to ask the obvious question which is can this thing be used to gain leverage on a plunger while attempting to unclog a toilet that has been attacked by a HTC lady and the fudgey abomination she extruded after a double chipotle burrito bowl lunch
08-18-2021, 09:38 PM
-
#3
 08-18-2021, 09:41 PM
-
#4
Originally Posted By Thunderpants⏩
Lmao, glad you showed up brah.I mean I’m going to ask the obvious question which is can this thing be used to gain leverage on a plunger while attempting to unclog a toilet that has been attacked by a HTC lady and the fudgey abomination she extruded after a double chipotle burrito bowl lunch
I am open to suggestions as to what I should put on the end of the battering ram. I was thinking the head of a toy ram, or dinosaur, or something cool.. I guess I could put a plunger on it
Originally Posted By Kiop⏩
Im not trying to monetize it or anything and I don't want to be a Youtard. Plus I'm constantly being called away to help my sons drill a hole or something on whatever they are working on, so it wouldn't make great TVstart a youtube channel
Damn
08-18-2021, 09:43 PM
-
#5
 08-18-2021, 09:43 PM
-
#6
- CremeFraicheBro
- Registered User
-

- CremeFraicheBro
- Registered User
- Join Date: Jan 2013
- Posts: 1,905
- Rep Power: 30907
-
-

Tower’s lookin thick solid and tight, keep us updated on how thick solid and tight that tower gets.
What kinda wood you using brah! Mirin workshop
What kinda wood you using brah! Mirin workshop
~The BRAVE Kreme De La Kareem of the Fraiche Klan, founder of the 3.50th Elite Division, called the Ph@ggot Freedom Fighters~
Femalewarriorxo is my love <3
“My garbage disposal eats better than most people”
~SS is my hater crew~
***2022 Aesthetics Crew***
08-18-2021, 09:45 PM
-
#7
- Rem0
- ( ͡° ͜ʖ ͡°)
-

- Rem0
- ( ͡° ͜ʖ ͡°)
- Join Date: Aug 2011
- Location: Australia
- Posts: 3,311
- Rep Power: 11070
-
-
Originally Posted By Kiop⏩
This srs, will appeal to multiple audiences and can make you some beer money, don't even have to show your facestart a youtube channel
*Reps good posts, doesn't rep back crew*
*Eats apple core crew*
*Socks n Sandals crew*
08-18-2021, 09:45 PM
-
#8
- BrosefMengele
- Banned
-

- BrosefMengele
- Banned
- Join Date: Dec 2010
- Location: In a dream, Antarctica
- Posts: 29,085
- Rep Power: 0
-
-
What? Not a REAL siege tower? I am disappoint.
08-18-2021, 09:47 PM
-
#9

 08-18-2021, 09:54 PM
-
#10
- multiplemiggs
- P E R V E R T
-

- multiplemiggs
- P E R V E R T
- Join Date: Nov 2019
- Posts: 57,385
- Rep Power: 568972
-
-
In on epic thread. Always mirin your work brah.
SPOT SOLD TO FROGTECH - 100% NATURAL GENETIC FROG FIBRES
see Krackerjacked's sig
never underestimate the slootiness of a sloot
-DrugsToGetBig
ratchet girls love the ebt flex
-havoc00
08-18-2021, 10:21 PM
-
#11
Originally Posted By gwg77⏩
Thanks mateLooking awesome, Jandels! I love your projects and looking forward to updates.
Originally Posted By CremeFraicheBro⏩
Thank you, the wood is Rimu which is a red pine. It's a NZ native tree, the early settlers cut down most of them. It's a reletivly difficult wood to work - it tends to split, has a blunting effect on tools and the dust is irritating to your throat and eyes. But no pain no gain!Tower’s lookin thick solid and tight, keep us updated on how thick solid and tight that tower gets.
What kinda wood you using brah! Mirin workshop
What kinda wood you using brah! Mirin workshop
Originally Posted By Rem0⏩
Nah, I'm sweet bro.This srs, will appeal to multiple audiences and can make you some beer money, don't even have to show your face
Originally Posted By BrosefMengele⏩
Lol, NZ is all hills brah, it wouldn't get far.What? Not a REAL siege tower? I am disappoint.
Originally Posted By bov188⏩
Mirin hard! Thats awesomeThat's fuking sick (srs)
Thanks for sharing. Here's my gift to you
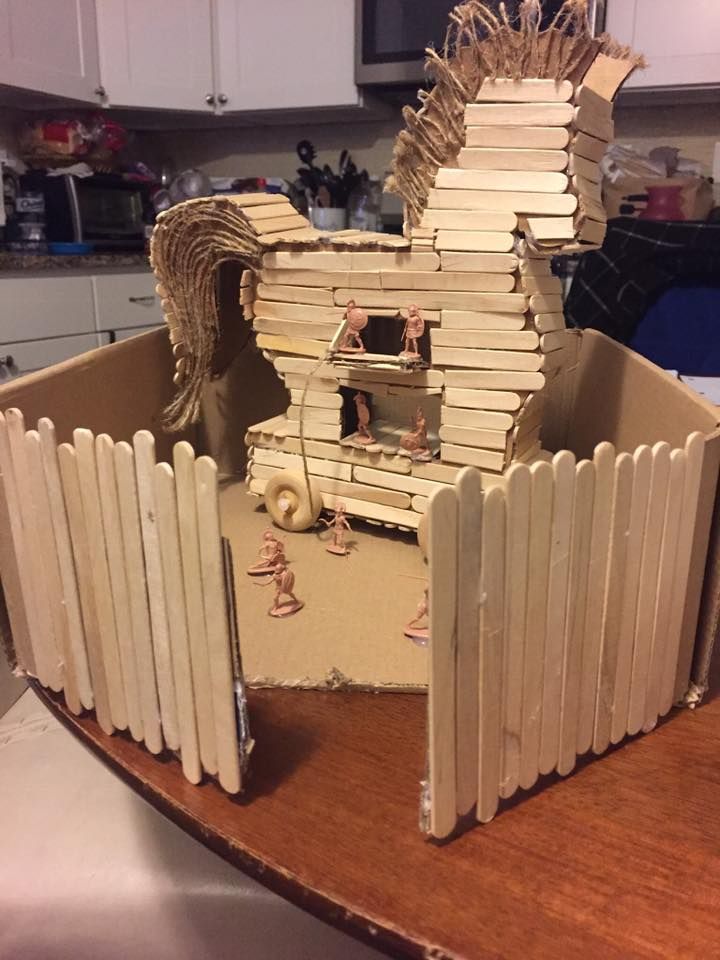
Thanks for sharing. Here's my gift to you
Originally Posted By multiplemiggs⏩
Thanks brah, stay tuned. Hopefully it works out.In on epic thread. Always mirin your work brah.
Originally Posted By SuperHercules⏩
Lol, it's not that technical really. I try to make plans, but if something doesn't fit I just cut it smallerI can't even draw a straight line with a ruler and this guy casually makes blueprints for a siege tower then starts building it
FML
FML
Damn
08-19-2021, 05:25 PM
-
#12
Always close your eyes before you blow.
I got a bit more done this morning.
I glue the wood on baking paper so it doesn't stick to my work bench. Time to scrape it off. I want to remove ALL the glue as its very obvious and ruins the look, I'm not too worried about gouging too far into the wood, any mistakes will be authentic battle damage!

Looks decent standing up, the top platform is in the bottom right.

While the glue dried, I cut down some more lengths, you can see the slight bullnose on these so the finished timber will be slightly uneven - which I think will look more realistic than a perfectly flat surface.

Finished lengths for the siding & floors (middle) the larger stuff on the left will probably be used for the draw bridge. The small pieces on the right will be used somewhere, maybe a flag pole.. nothing will be wasted.

I got a bit more done this morning.
I glue the wood on baking paper so it doesn't stick to my work bench. Time to scrape it off. I want to remove ALL the glue as its very obvious and ruins the look, I'm not too worried about gouging too far into the wood, any mistakes will be authentic battle damage!
Looks decent standing up, the top platform is in the bottom right.
While the glue dried, I cut down some more lengths, you can see the slight bullnose on these so the finished timber will be slightly uneven - which I think will look more realistic than a perfectly flat surface.
Finished lengths for the siding & floors (middle) the larger stuff on the left will probably be used for the draw bridge. The small pieces on the right will be used somewhere, maybe a flag pole.. nothing will be wasted.
Damn
08-19-2021, 05:39 PM
-
#13
 08-19-2021, 07:04 PM
-
#14
Originally Posted By Antoine99⏩
It's never too late to learn new skills brah. I started off small with few tools of my own and made heaps of mistakes. Those bullnose boards above were cut that way by accident - before I had my table saw I would screw my circular saw to the underside of some plywood and clamp other boards down as a fence. Needless to say it wasnt very accurate!Wish I was that handy (no homo)
I'm glueing one side of the axles into the undercarrage, so I can still pull it apart to put the wheels in. I'll leave it overnight to make sure the glue is dry before moving it.

Time to think about that battering ram
Damn
08-19-2021, 07:07 PM
-
#15
 08-19-2021, 07:11 PM
-
#16
- Muscle2021
- Registered User
-

- Muscle2021
- Registered User
- Join Date: Jan 2021
- Age: 56
- Posts: 12,737
- Rep Power: 73379
-
-
What kind of a bish ass country still has lockdowns?
***NEUTRAL CREW*** ™
08-19-2021, 07:44 PM
-
#17
 08-20-2021, 01:22 AM
-
#18
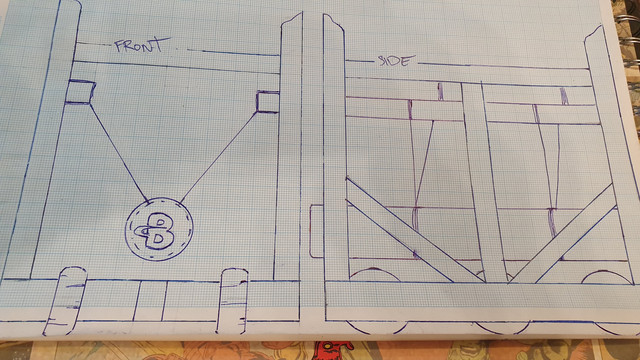
Heres a rough 1:1 scale drawing of the battering ram. I'm not 100% happy with how its hanging, I'll probably end up adding more bracing. I will use a 30mm dia. stick, instead of doweling, so it will look more like a real tree and waxed polyester cord for the rope
Damn
08-20-2021, 01:43 AM
-
#19
 08-20-2021, 01:57 AM
-
#20
Originally Posted By Johnez⏩
Thanks mate. I'm just building it for fun, I think I'll keep it on my desk as display.Looks badass opie. Is this for any specific purpose (table top games?), or did you just decide to build it for fun?
Damn
08-20-2021, 04:13 PM
-
#21
08-20-2021, 04:26 PM
-
#22
 08-20-2021, 04:33 PM
-
#23
- PepperedAngus
- Registered User
-

- PepperedAngus
- Registered User
- Join Date: Sep 2011
- Location: United States
- Posts: 24,170
- Rep Power: 274420
-
-
Originally Posted By Jandels⏩
Ram cawk up ass of castles.I am open to suggestions as to what I should put on the end of the battering ram. I was thinking the head of a toy ram, or dinosaur, or something cool.. I guess I could put a plunger on it
Put a dildo on there.
For every man, there is a sentence, a string of words, that has the power to destroy him
"The strong do what they can, and the weak suffer what they must" -Thucydides
Shall not be Infringed. FUK CHINA.
08-20-2021, 04:46 PM
-
#24
 08-20-2021, 06:08 PM
-
#25
Originally Posted By stupid000⏩
Neat, but does this mean his wife kicked him out?That's cool bro. My buddy did something like this but when he was done he ended up building a dog house.

Originally Posted By AWillis⏩
You guys are srs about this youtube stuff huh.damn missing out on those easy dollars on youtube
would be getting 100k views per vid
would be getting 100k views per vid
Originally Posted By PepperedAngus⏩
Lol, some of those old fashioned dildos did look like weapons.Ram cawk up ass of castles.
Put a dildo on there.
Put a dildo on there.
Originally Posted By krioro⏩
Progress update.Neat.gif
This is the stick I will use as the battering ram, it'salmoststraight

Scraping the bark off with the back of the knife

I thought about using the pencil sharpener to make my point, but I went with a knife instead to give it a hand made look. I also got the cross piece supports for the floors sized down. Now we wait for the glue to dry.

Damn
08-22-2021, 04:58 PM
-
#26
- Be patient and wait for the glue to dry.
All the beams are now glued in, and drying. I've started cuting the siding down to size - see pic. This will cover the east and west sides completely and the back will be open.

The front is more complicated - the bottom level will be mostly clad, except for an opening for the battering ram. The second and third levels will have small windows for archers and the 4th level will have the draw bridge.
Next step will be the battering ram, flooring and internal ladders.
All the beams are now glued in, and drying. I've started cuting the siding down to size - see pic. This will cover the east and west sides completely and the back will be open.
The front is more complicated - the bottom level will be mostly clad, except for an opening for the battering ram. The second and third levels will have small windows for archers and the 4th level will have the draw bridge.
Next step will be the battering ram, flooring and internal ladders.
Damn
08-22-2021, 05:13 PM
-
#27
08-22-2021, 06:31 PM
-
#28
Originally Posted By stupid000⏩
Thanks man. Each progress update is probably 2 hours work. I'm stranded on lockdown so I'm not taking any short cuts. If I'm not happy with something now, I won't be happy with it in the futureDamn, dude, looking good. How many hours you put into it now?

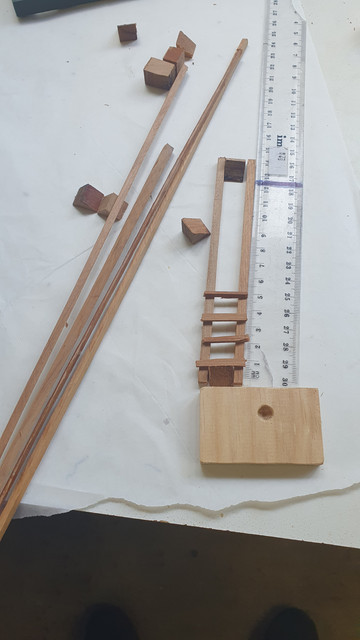
I've added extra floor supports for the internal ladders and am glueing in the supports for the ram. When using wood glue, it's not enough to just place the piece on top of the glue as it can 'travel'. I try to clamp stuff down as best I can, this is an awkward looking one.
Damn
08-22-2021, 07:31 PM
-
#29
 08-22-2021, 09:11 PM
-
#30
- stupid000
- Registered User
-

- stupid000
- Registered User
- Join Date: Jan 2020
- Age: 56
- Posts: 8,729
- Subscribers: 1
- Rep Power: 95270
-
-
Originally Posted By Jandels⏩
Is that an ash tray? What are you using for your clamp?Thanks man. Each progress update is probably 2 hours work. I'm stranded on lockdown so I'm not taking any short cuts. If I'm not happy with something now, I won't be happy with it in the future
I've added extra floor supports for the internal ladders and am glueing in the supports for the ram. When using wood glue, it's not enough to just place the piece on top of the glue as it can 'travel'. I try to clamp stuff down as best I can, this is an awkward looking one.
I've added extra floor supports for the internal ladders and am glueing in the supports for the ram. When using wood glue, it's not enough to just place the piece on top of the glue as it can 'travel'. I try to clamp stuff down as best I can, this is an awkward looking one.
Bookmarks
-

- Digg
-

- del.icio.us
-

- StumbleUpon
-

-

Posting Permissions
- You may not post new threads
- You may not post replies
- You may not post attachments
- You may not edit your posts